Procedure for adding a new algorithm
Example of Algorithm Addition Procedure
Below we describe an example procedure for adding a new algorithm.
Prerequisite
Sample Algorithm Name …
new_algoSample Algorithm Function Name …
new_algo_func{OPTINIST_SRC_DIR} … Replace with the actual source storage directory path.
1. Prepare necessary directories and files for the algorithm
First, prepare the necessary directories and files for the algorithm.
{OPTINIST_SRC_DIR}/studio/app/optinist/wrappers/
__init__.py
xxxx/
yyyy/
…
new_algo/(*1)__init__.py (*2)
new_algo_func.py(*3)… (*4)
Explanation:
(*1) The name is arbitrary, but
{algorithm name}is the standard.(*2) Empty first.
(*3) Empty first.
(*4) Prepare other files to be added.
2. Algorithm implementation
Import statement description
Target file
{OPTINIST_SRC_DIR}/studio/app/optinist/wrappers/
new_algo/new_algo_func.py
from studio.app.common.dataclass import *
Explanation:
If the required dataclass does not exist, you can add your own.
see. DataClass
Define the Input/Output of the function and implement the logic.
Target file
{OPTINIST_SRC_DIR}/studio/app/optinist/wrappers/
new_algo_wrapper/new_algo_func.py
The function code is described below.
def new_algo_func(               # (*1)
        image_data: ImageData,   # (*2)
        output_dir: str,         # (*3)
        params: dict=None        # (*4)
        **kwargs,                # (*3)
    ) -> dict(fluo=FluoData):    # (*5)
    import numpy as np
    info = {
        "fluo": FluoData(np.random.rand(100, 20), file_name="fluo"),
        "image": ImageData(np.random.rand(10, 100, 100), file_name="image"),
        "heatmap": HeatMapData(np.random.rand(20, 20), file_name="heatmap")
    }
    return info
Explanation:
(*1) Function name can be any content.
(*2) The first argument specifies the input data type. (This is also reflected in the GUI.)
(*3) Add these arguments. These arguments are required for the handling workflow.
(*4) This argument receives the function parameters.
(*5) The return value is a dictionary type. (This is also reflected in the GUI.)
Definition of information to be displayed in the GUI
Target file
{OPTINIST_SRC_DIR}/studio/app/optinist/wrappers/
new_algo/__init__.py
from studio.app.optinist.wrappers.new_algo.new_algo_func import new_algo_func

new_algo_wrapper_dict = {                       # (*1)
    'new_algo': {                               # (*2)
        'new_algo_func': {                      # (*3)
            'function': new_algo_func,          # (*4)
            'conda_name': 'new_algo',           # (*5)
        },
    }
}
Explanation:
(*1) The variable name is arbitrary, but
{algorithm_name}_wrapper_dictis the standard.(*2) Algorithm name can be any text (display label to GUI)
(*3) Algorithm function name can be any text (display label to GUI)
(*4) Algorithm function name specifies the actual function name
(*4, 5) The conda setting is optional (to be defined when using conda with snakemake)
3. Algorithm Registration
Register the created algorithm to the application by adding the following settings.
Target file
{OPTINIST_SRC_DIR}/studio/app/optinist/wrappers/__init__.py
from studio.app.optinist.wrappers.xxxx import xxxx_wrapper_dict
from studio.app.optinist.wrappers.yyyy import yyyy_wrapper_dict
...
from studio.app.optinist.wrappers.new_algo import new_algo_wrapper_dict    # <-- Add

wrapper_dict = {}
wrapper_dict.update(**xxxx_wrapper_dict)
wrapper_dict.update(**yyyy_wrapper_dict)
...
wrapper_dict.update(**new_algo_wrapper_dict)    # <-- Add
After the registration process up to this point, restart the application browser to confirm that the algorithm has been added.
Detailed Explanations
DataClass
Optinist defines several DataClasses to ensure consistency between Input and Output types. The main data types are as follows. These correspond to the color of each Node’s handle.
Optinist support datatype.
ImageData
TimeSeriesData
FluoData
BehaviorData
IscellData
Suite2pData
ScatterData
BarData
Input & Output handle
In the following example, the new_algo_func function takes ImageData and returns FluoData.
from studio.app.common.dataclass import *

def new_algo_func(
        image_data: ImageData,
        output_dir: str,
        params: dict=None,
        **kwargs,
    ) -> dict(fluo=FluoData):
    return
Restart the Application and place new_algo_func on the GUI , and you will see that the handle color has changed.
Function Parameter Definitions
Function input parameters (input on GUI) can be defined in the following file.
{OPTINIST_SRC_DIR}/studio/app/optinist/wrappers/
new_algo/params/{algorithm_function_name}.yamlSample:
new_algo_params_1:
  filtersize1: 10
  filtersize2: 20
new_algo_params_2:
  filtersize3: 30
  filtersize4: 40
Explanation:
{algorithm_function_name} must match the actual function name.
Drawing output results
Above we described the node input and output handle, here we describe the visualization of the result.
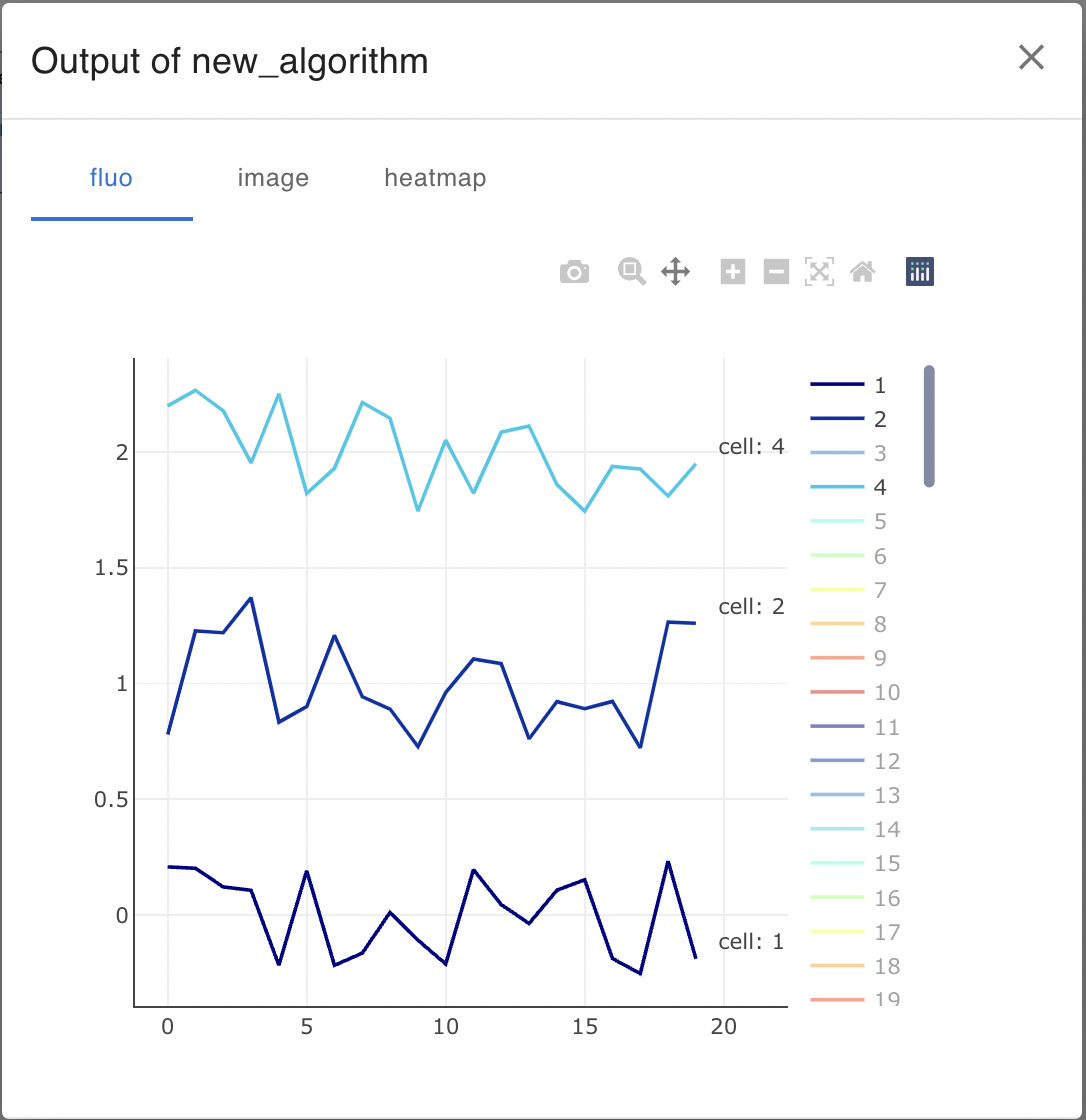
The output of the function is a dictionary. (Here we use the variable info.)
First, the fluo variable that is the return value of the new_algo_func function is output by Wrap with FluoData. The name of the key in this case must match the fluo of the return value when declaring the function.
In addition, variables to be visualized are wrapped with their data types and output. In this example, ImageData and HeatMap are output.
def new_algo_func(
        image_data: ImageData,
        output_dir: str,
        params: dict=None,
        **kwargs,
    ) -> dict(fluo=FluoData):
    import numpy as np
    info = {
        "fluo": FluoData(np.random.rand(100, 20), file_name="fluo"),
        "image": ImageData(np.random.rand(10, 100, 100), file_name="image"),
        "heatmap": HeatMapData(np.random.rand(20, 20), file_name="heatmap")
    }
    return info
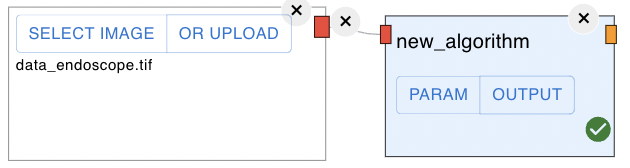
Restart the Application, connect imageNode and run it, and you will see the output as follows.
Note:
This is a quick process (only a few seconds), so if the process does not terminate, an error may have occurred. If the error persists, please submit a question to the issue.
Customize plot metadata
You can set plot title and axis labels to some output.
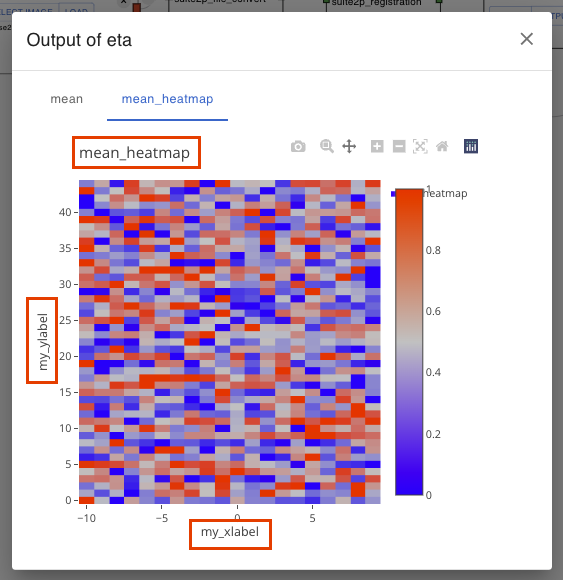
To do this,
import PlotMetaData in the algorithm function file.
Add PlotMetaData to the output dataclass’s
metaattribute with title or labels you want. If you need only one of them, you can omit the other attributes.from studio.app.common.schemas.outputs import PlotMetaData def new_algo_func( image_data: ImageData, output_dir: str, params: dict=None, **kwargs, ) -> dict(fluo=FluoData): import numpy as np info = { "fluo": FluoData( np.random.rand(100, 20), file_name="fluo" meta=PlotMetaData( title="my fluo", xlabel="my xlabel", ylabel="my ylabel", ), "image": ImageData(np.random.rand(10, 100, 100), file_name="image"), "heatmap": HeatMapData( np.random.rand(20, 20), file_name="heatmap", meta=PlotMetaData( title="my heatmap", # You don't have to set all attributes ) ) } return info
Note
Following dataclasses are not supported to visualize these metadata.
CsvData
HTMLData